Monday, April 29, 2013

Statement Making Kicks

Spring is finally here and that means it is time for new statement making shoes both flat and heels. The two most important rules to follow when picking out your new kicks are comfort and style.  I also suggest looking for details like studs, ankle straps, cutouts, metallic, and bright colors for uniqueness. Always spend more money on a classic shoe over a trendy shoe. Here's what I'm currently craving!

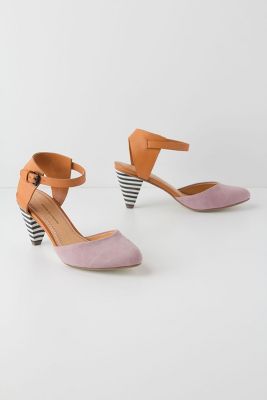
Anthropologie Korin d'Orsays Heel. Find them here
Korin d'Orsays

Zara Studded Heel. Find them here
 Image 1 of STUDDED HIGH HEEL SANDAL from Zara

Anthropolgie Toledino Peep Toe Heel. Find them here
Toledino Peep-Toe Booties

Zara Strap Heel. Find them here
 Image 1 of HIGH HEEL SHOES WITH ANKLE STRAP from Zara


Joie Laurel Raffia Heels. Find them here
 

 Tahari Sabina Heel. Find them here

Yosi Samra Reptile Flat. Find them here
 

Enzo Angiolini Austyn Flat. Find them here
 

Kate Spade Trixie Ballet Flat. Find them here

Sole Society Katarina Ballet Flat. Find them here


Luxury Rebel Romi Ballet Flat. Find them here


Melissa Zigzag Flat. Find them here


Hunter Romilly Ballerina Flats. Find them here


Friday, April 26, 2013

Marissa Webb Design

You might not recognize her face...... but you definitely know her design.  Marissa Webb worked as head of  J. Crew's Women's Design for a decade before she decided to break free and design her own label "Marissa Webb".   She made her debut at New York Fashion Week last Fall  to showcase her Spring 2013 line. The collection was created to appeal to women who appreciate timeless fashion pieces, but maintains the confidence to incorporate contrasting and unexpected pieces. Marissa's designs have a masculine edge while still having a feminine elegance. You can find her line at Barney's and we find it oh so smashing.  We both love her design, her style, her beauty and most importantly her compassion.


Marissa Webb 2013 Spring Line


HAPPY FRIDAY!

courtesy: pinterest

Wednesday, April 24, 2013

Season Up Your Grill With Artichokes


This week we're celebrating spring. It's about time to pull out the grill and cook with all the seasonal produce the market has to offer. Bring on the artichokes!

Ingredients
  • 5 large lemons
  • 2 large artichokes
  • 2 cups extra-virgin olive oil
  • 1 T. sea salt
  • 1 tsp. freshly ground pepper, to taste

Preparation

  1. To prepare artichokes: Fill a large kettle with water and bring to a boil. Trim leaves from the top of an artichoke. Remove the outer layer(s) of leaves from the stem end. Trim an inch off the bottom of the stem and use a vegetable peeler to remove the outer layer. As each artichoke is prepared, rub the stems with fresh lemon. Cut the artichokes in half. Scoop out the choke and the first few inner layers in the center until the bottom is revealed.  Rub the insides with lemon.  The lemon juice will prevent it from turning brown.
  2. Then submerge them into the boiling water with tongs placing them with the cut side up. Cover the kettle, but leave breathing space. Boil until the base of the stem can be pierced with a fork, approximately 30 minutes. Transfer to a cutting board and let stand until cool enough to handle, about 10 minutes.
  3. In a mixing bowl combine 4 freshly squeezed lemons(depending on juice amount), 2 cups extra-virgin olive oil, 1 T. sea salt, 1 tsp. freshly ground pepper and mix. Place one half artichoke at a time into a one gallon Ziploc baggie adding marinade over the top of each half.  Refrigerate for a minimum two hours. 
  4. Preheat grill to high. Grill the artichokes until lightly charred, about 3-5 minutes per side. Transfer to a serving platter and garnish. Serve warm.


Monday, April 22, 2013

Sea Fan Tutorial

There's so much beauty and mystery to a sea fan. They bring a sense of calmness to any room and bringing nature into the home is a great way to elevate your interiors.  I have been lusting after the Sea Fan pictures that Restoration Hardware sells.  Being I love a good DIY project I decided to make my own Sea Fan picture. Here's how I did it! 


My husband, Kohler's Grandmother gave us two old wooden frames that she no longer wanted. I was ecstatic that she was giving them to me being these frames would cost anywhere from $50-$200 at a local antique store.  I couldn't wait to display them somewhere in our home.  I decided one frame would go in the master bath and one in the powder bath.  Inside them I would display my beautiful sea fans I had bought at Hunt and Gather (A local antique store in Minneapolis). I painted one frame black (Obsidian paint from Restoration Hardware) and I kept the other frame in its original state.  


 I bought linen fabric at the local fabric store. If you live in the Minneapolis area SR Harris Fabric Outlet is a fabulous place to buy discounted fabric or Jo-Ann Fabrics is a great place to find cheap fabric as well.


 I used a staple gun to attach the fabric to the back of the frame.  Make sure to buy extra fabric so you have enough to pull fabric tight and staple.


 Next, I cut the extra fabric so it looked clean.


 I attached a wire from side to side to hang the framed piece.


The finished product in our powder bathroom. The wall color in our powder bathroom is obsidian (which is a stunning black) from Restoration Hardware. The black frame against the black wall is so sleek and sexy. I  layered the sea fans and nailed them to the linen and the wall after I hung the frame. You could also use a needle and thread to attach the sea fan to the fabric. Another great way to add color to your piece is to spray paint the sea fan a different color. A pop of blue, pink or red would brighten up any room.


This is the Sea Fan in our master bathroom. The paint color in this bathroom is Slate (a warm gray) from Restoration Hardware as well. This is were I love soaking in my tub.... in such a pretty, peaceful arena.


Inspirations


You can also use them as presentation pieces for entertaining.
 The possibilities are endless!


Courtesy: Pinterest, RH